side bars

Showing posts with label Tina's Scrapbooking. Show all posts

Monday, November 26, 2012

Round Two! - Simple Stories Christmas Cards class - December 5th

The moment I saw the Simple Stories Handmade Holiday line I got excited about it. Don't get me wrong, I love Christmas in general, and I love Christmas paper in general, and believe me I have hoards of it, I have 3 entire shelves devoted to Christmas lines of past. This line spoke to me with the olive green and deep red with beige and music notes. Love it!

I have put together a 6 Christmas card class that I will be teaching at Tina's Scrapbooking in Winchester on November 14th. This class is now sold out - a 2nd class has been added - December 5th, 7:00 - 9:30!
This class is full of different techniques including heat embossing, and paper quilling.


First class sold out - 2nd class set for Dec 5th, call the store to reserve your spot today, don't be dissapointed! To reserve your spot call Tina today at 613-774-4611.

Hope to see you there!


Wednesday, November 7, 2012

Simple Stories - Handmade Holiday Christmas Cards class upcoming

The moment I saw the Simple Stories Handmade Holiday line I got excited about it.  Don't get me wrong, I love Christmas in general, and I love Christmas paper in general, and believe me I have hoards of it, I have 3 entire shelves devoted to Christmas lines of past.  This line spoke to me with the olive green and deep red with beige and music notes.  Love it! 

I have put together a 6 Christmas card class that I will be teaching at Tina's Scrapbooking in Winchester on November 14thThis class is now sold out - a 2nd class has been added - December 5th, 7:00 - 9:30! 
This class is full of different techniques including heat embossing, and paper quilling. 


First class sold out - 2nd class set for Dec 5th, call the store to reserve your spot today, don't be dissapointed!  To reserve your spot call Tina today at 613-774-4611.

Hope to see you there!


Monday, May 14, 2012

Advanced Copic class - Faces & Hair

There are still a few spots left in my "Faces & Hair" advanced Copic class for this Wednesday May 16th at Tina's Scrapbooking in Winchester.
This is my favorite Copic class that I teach, I love colouring the little characters and doing up their hair and skin tones ... the only prerequisite to this class it to have taken the basic class prior.

You will be asked to bring the following markers with you:

E000, E00, E01, R20, Y21, YR23, E17, E31  (all will be available for purchase at the store as well)

Call Tina to register today if you have not done so - 613-774-4611

Sunday, April 29, 2012

A day on the farm

Two summers ago our family went to visit an old acquaintance's organic farm.  My daughter had so much fun playing with the goats, sheep, chickens and other animals.  She had seen most of these animals before, but not up close that she could touch them.  It was a great adventure for sure.


Tina asked me to do some farm layouts with some Kaisercraft Cockadoodledoo collection.  I did another layout with this "this little piggy" see HERE, but I wanted to do something more 'farmish' so I printed a large photo of my daughter and husband in the field with the sheep and washed out the colours a bit.  I cropped down the photo and added two pieces of wooden fence that I had painted with crackle distress paint.  Added a couple of fussy cut sheep and a bit of border punch, a title and this layout was done.  A five minute layout.  It took me longer to blog about it than it did to create it, but I just love it!  Tell me what you think - leave a comment below.

Thursday, April 12, 2012

Tina's Scrapbooking Winter kit --->> the results

Tina's Winter 2011/2012 Contest kit was nothing short of amazing.
I have a love for pink, and those of you who know me will know that I don't need an excuse to make a pink layout - heck I would even scrap my son on a pink page if I think I could get away with it!


Here is the rundown for what is in the Winter kit.


My Little Shoebox - Winter Wonderland - Gum Drop Lane (2)
My Little Shoebox - Winter Wonderland - Starburst
My Little Shoebox - Winter Wonderland - Cardstock Sticker
Doodlebug Designs - Santa's Workshop - Pretty poinsettias (2)
Doodlebug Designs - Santa's Workshop - Jolly Dots (2)
Doodlebug Designs - Santa's Workshop - Holiday Tweed(2)
Doodlebug Designs - Santa's Workshop - 4x6 cutouts (2)
1 sheet white cardstock (smooth)
1 sheet light blue cardstock (textured)
1 sheet light pink cardstock (textured)
2 white snowflake buttons
6 felt snowflakes (blues and white)
4 snowflake stickers
1 Clear Scraps plastic snowflake (clear) 4"
12" pink stitched ribbon
1 large white Tim Holtz tag

An amazing photo taken on Christmas day 2011.  I used several boarder punches to give this affect, and liquid pearls for all the 'snow' dots.  For the acrylic snowflake I used white StazOn ink and stamped snowflakes and the edges of the snowflake.


 This is my least favorite of my layouts - it's too busy for my liking.  I used the snowflake buttons in the centres of my poinsettias and coloured them yellow - worked for me!!

A fantastic photo taken by the ever talented Jennifer Carroll over at Live Laugh Photograph
 Inspired by the Damien Hirst spot paintings - as I had NO idea what to do with this polka dot paper!!
Coloured the title with my copics and glued to clear acetate and popped up with Scrap Dots

 My favorite layout of the bunch, it's pink, need I say more?  Handmade flowers again, and leaves.


So, as you can see I got quite a few layouts out of this kit - five to be exact, and I could have squeezed out another one or a few cards had I given myself a bit more time, and I have no excuses - I just never picked up the kit until it was almost closing time.  My favorite layout is the first one I made "Angel" I'm really happy with the way the flowers turned out and the title.  Except for that I used my entire allotted 12" of ribbon on this title. 

Remember I have a flower making techniques class coming up at Tina's Scrapbooking on April 25th - call or email to reserve your spot!

I'm pleased as punch to say that I shared the victory of winning the Winter kit prize with the Uber tallented Christine Levere-Vanderbroek!

~Lorena~

Tuesday, April 3, 2012

Its Flower Time!

Are you curious about how I make some of my handmade flowers?Well here is your chance to learn how to make them.  I will be doing a two hour tutorial on five different flowers; providing you step by step instructions and guidance to make your own flowers!

All you will need to bring with you is the following:

- scissors
- quilling tool or tweezers (if you have them)
- Tim Holtz "Tiny Attacher" stapler (if you have one)
- Aqua (pen if you have one)

I will have adhesives, materials and all punches and inks needed to produce these little lovelies, but if you want to bring your own distress inks, stapler and glue (I suggest Helmar 450 and Tombow Multi)


There are limited spaces left - if you are interested in learning these flower making techniques join me on Wednesday April 25 from 7:30 to 9:30 in Winchester, Ontario at Tina's Scrapbooking Creations!!  Call Tina to reserve your spot today - 613-774-4611.

~Lorena~

Wednesday, March 7, 2012

More Little Yellow Bicycle Winter Twig

Crisp blue, cool steely grey, a hint of mossy green and a dash of chocolate brown accent.  The Winter Twig collection from Little Yellow Bicycle is great to work with.  I have always loved the canvas like texture to LYB papers.  I did however pair this winter paper with photos of my son that were not taken in the winter at all, they were in fact taken in the hottest week in September, but the colour in his shirt really went well with this paper - who says you have to have winter photos on a winter paper? 
Little One

I kept a very horizontal look to this very simple layout and added a title that I cut with my Cricut (Calligraphy Collection) and distressed with some Ranger Distressing Inks (vintage photo & gathered twigs)  Two of my handmade flowers top off this layout and of course some Prima leaves tucked in there.  I am SO not afraid to put flowers on my boy layouts - not even a little!


Smile


I used Ranger Distress Stain in Picket Fences to tone down the beautiful pine cone paper so that I could journal on it. I altered the colour on the button to my liking by using my copic markers and giving it a textured look. My favorite chipboard letters from Basic Grey (Piper in Milk Chocolate Chip - and had I known they would discontinue making them I would have bought 50 packages!!!)  I made my own flowers as usual - two different styles; and if you are interested in learning some of my flower techniques I suggest that you sign up for my flower making class that I will be giving at Tina's Scrapbooking Creations on April 25th.  I supply all the materials and show you how to make 5 different flowers to add to your layouts, cards and altered projects, all for the amazing low cost of $20!

Monday, February 27, 2012

Winter Twig cards

Here are a couple of cards I made with the Winter Twig collection from Little Yellow Bicycle.
I used some Penny Black stamps as well - Mimi's Christmas and coloured with my copics.


(This is the inside of the 2nd card)


Let me know what you think!

Friday, January 27, 2012

Thursday, October 27, 2011

First Christmas Layout of 2011!

Well there is less than two months to Christmas .... yes, believe it or not, you have less than 60 shopping days left to get all of your gifts bought, wrapped and under the tree.
Traditionally I put the tree up on December 1st, but I'm just not feeling the spirit ... maybe I will in December, but until then I have my craft - my art - my scrapbooking.

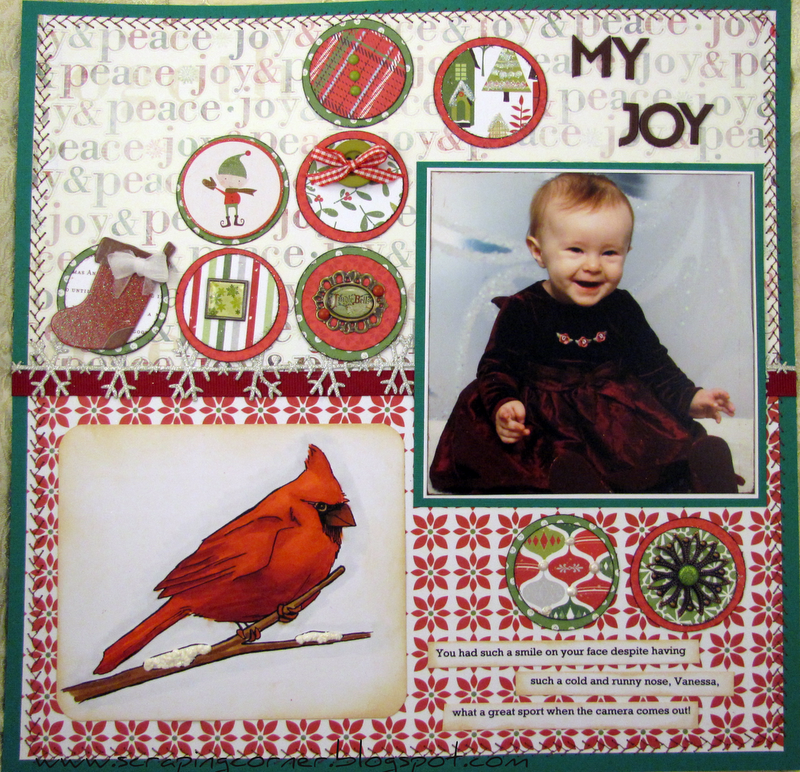
Tina gave me some Little Yellow Bicycle "Wonder & Wishes" to design with. I used an old photo of my daughter.  This was her first official photo shoot.  I think it was November 2008.  All I remember is she has a really snotty nose, and it was just after my father had passed away.  It really wasn't a great time in my life.   But she was such a good sport, she smiled so big for the camera ... I was one proud Momma that day.

I used the Scrapbook & Cards Today 2011 Sketch Calendar  for this layout.  I always love a single photo layout, and December was perfect for this layout.

My Joy


Supply list:
Patterned Paper: Little Yellow Bicycle
Cardstock: Bazzil
Extras: Little Yellow Bicycle chipboard, Basic Grey letters, button, and brads, Bo Bunny Trinkets, Misc. ribbon.

I white washed the "joy to my world" patterned paper at the top, it was just too distracting, not that the poinsettia paper at the bottom wasn't, but I could cover most of it up with the photo, journaling and Copic image.

I'm also thinking of applying for a new DT position. This one with Copic Marker Scrapbooking. They get alot of exposure and I think I might be a good fit.    Sometimes I doubt my ability. I think that everyone is so much better than me. What is the worst thing that can happen/be said? Well they can say "thank you for your interest, but we have selected others" and then I look at who they have selected and say "wow, they are good, damn good, you made the right decision" but if you don't try you never will get rejected, nor will you get selected huh?

So, anyway, the cardinal is from Copic Marker Scrapbooking.  I'm still sitting on the fence weather to send this to them or not.  Notice the Puffy Velvet on the branch? It's suppose to look like snow .... hubby says it looks like bird poop.

That's it for this round, enjoy!

Wednesday, October 19, 2011

New Design Team position

I'm very excited to announce that I have been selected to join the Design Team with Tina's Scrapbooking Creations in Winchester Ontario.

I have been added along with 4 other very talented gals!  I invite you to take a look at the bio's and blogs of the other ladies here

Here is a little something that I have been working on with the new Printery collection from Prima Marketing.


This layout is a photo shoot that we had done for my first Mother's Day after my daughter was born - she was about 2 months old here.  I have some huge regrets about these photos though.  The photographer; Roxanne Morin was wonderful enough to put the entire photo shoot onto a CD for me, and I have since lost that CD and only have the photos that I printed out originally - I haven't even got them saved to my computer.

Supply list:
Patterned Paper - Prima Marketing - Printery collection
Canvas - Prima Marketing - Printery collection
Stamps - Prima
Flowers - Prima - Londonary collection
Bling - Prima
Resist - Crafter's Workshop
Glimmer Mist
Letters - Basic Grey

You see that little bow on the waist of the dress form?  That was done using a dessert fork!  Yeah pretty neat technique.

Thank you for looking!

Monday, January 17, 2011

Seasonal Kit from Tina's Scrapbooking Creations - Winter layouts (3)

Well, Tina stumped me again with her various patterned papers in her Seasonal Kit, a grand mix of Echo Park, Little Yellow Bicycle, Bo Bunny, Creative Imaginations and some little trinkets.

Well, here is what I have come up with so far, three layouts, and started my fourth.

The first I will call Yuletide Carols;
Using the Little Yellow Bicycle paper as a title for this one, I used my clear embossing technique with a roller stamp that I have from Stampin' Up for the music notes on the background.  I stitched around the outside edge (told you would see more stitching from me!) I covered a chipboard tag from the kit and used the ribbon from the kit to complete it.  The journaling reads
"With their eyes all a glow... You guys enjoyed that electronic piano that Daddy got you for Christmas SO MUCH! Hours of fun tickling the ivory! Nigel & Vanessa Dec. 27th 2010"


The second I am calling Waiting...
OK, Tina is going to kill me over this one, but I absolutely hated the Little Yellow Bicycle paper that she put in there, it is full of Christmas sayings, some of it in metallic red foil print ... so what did I do with that paper?  Aside from the odd little word here or there that I cut out and used for titles etc.  I flipped it over and used the white backside and glimmer misted it!  I cut out some of the ornaments from the Creative Imaginations paper and the trees from the same line, and used pop-dots to give it some dimension.  This is my absolute favorite photo this Christmas, and it wasn't even taken by myself, it was taken by my sister.  We must have taken 100 photos that day, and this was the best we got!  I used Glossy Accents on the title to make it pop.  No stitching on this one, but I did dashed lines to look like stitching.  The journaling reads
"Patiently waiting for Santa Vanessa 2010"


The third I am calling Frosty The SnowDUDE; it is based on a sketch by one of Tina's designers Jill Sarginson.  You know me and circles, I love them!!  I kept this layout pretty tone on tone with the blues and browns from the kit. More stitching around the border.  I tried to give this layout some dimension by making the snowflakes in layers.  I glimmer misted the backside of the LYB paper again for the inside of the snowflakes.  I put my Big Shot to use with a snowflake embossing folder in the smaller blue circle.  I used Glossy Accents again on my title to make it stand out.  The journaling reads
"Daddy helped Vanessa  build a SNOW DUDE! Complete with a MOHAWK!! December 2010"

Total Pageviews

LinkWithin

Related Posts with Thumbnails