side bars

Saturday, July 28, 2012

Altered Clock - before & after + a big piece of Copic news!

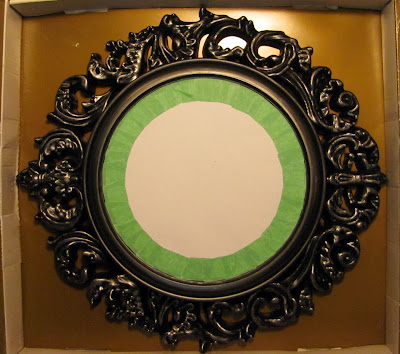
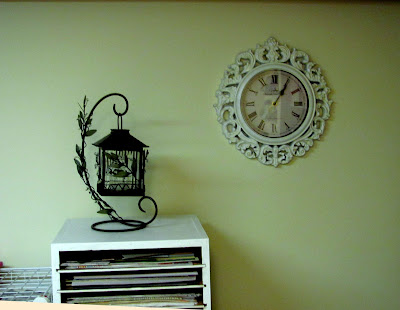
As most of you know I have just re-vamped my Craft room.  I am a big fan of clocks - in every room I have at least one.  I like to be able to see what time it is from anywhere in the house.... yes I even have a clock in the bathroom (it's probably my most important one actually)  I love the vintage roman numerals on a clock - I love the Westminster chime (I have two that chime Westminster but Hubby won't let me turn the chime on 'too noisy' LOL) and I love the gentle tick tick in the background - it reminds me I have a pulse.  Anyway, I had been looking for the perfect clock for my room - because the one on my vintage radio + the one on the phone + the one on my computer were not enough for me ... I needed something big on the wall, something that you can see anywhere in the room, and something vintagy.  So... after looking at Kijiji and not having much luck, I went to Winners/Home Sense and found a decent looking one. (for NINE bucks I might add).  It was, however, black with *silver* highlights or distressing, and made of plastic (isn't everything in our lives?)  I decided I was going to paint it ... so I covered the face up with painters tape and paper and took out a can of white spray paint and went to town on it - three days, three coats and no longer was it black it was this off shade of white - but the paint wasn't really adhering, it was not quite blistering, it was crackling!  Perfect!  I have so many scrapbooking products that I use to make things crackle and here my clock was doing it all on its own! Awesome!  After which I mixed up some acrylic paints (brown, white and yellow) to make a beige and put it into the grooves of the clock (Hubby calls that the 'dust' look) he may be right LOL!
Anyway - here are some before and after shots - please note that the before shot I had already covered up the face - sorry about that.


OK, maybe you can't see my beige distressing or the crackles - I'll try and get a better photo for you, maybe take the clock outside in the sunlight tomorrow.  Cheapy clock turned chic!

And for my other news - my big news - I am proud to say that I am now a part of the Copic Markers Scrapbooking Design Team!  You are going to love Copic Markers Scrapbooking site - they have many different digital stamps - including some freebies right now.  Every release of digital stamps they tend to put out a free stamp.  They also sell Copic markers on their site - at a very decent price I might add.  I'm stoked to be a part of this team, to be able to showcase my Copic colouring for a stamp company.  I'm excited to be part of the team.  Be sure to keep an eye on the Copic Markers Scrapbooking blog to see my colouring creations and each of the other DT members too!

Well that's it folks, as always I welcome your comments - actually I'm begging for them - let me know your thoughts!


Tuesday, July 24, 2012

It's a bird, it's a song, it's a Songbird!

Prima has so many beautiful lines out with their last CHA release.  Songbird was one I truly enjoyed working with.  I took a class with the Uber talented Cari Fennell on National Scrapbooking day where we used this collection on some tags.  I had so much left over I knew I was going to do a layout. And when Emma provided the DT with the collection as well, I knew that the extra from my layout and the tag class I will have enough for more than one layout.  So, here is my first 'extra' layout.
This layout is about my teeth .... yes, you read me right, I did a layout about my teeth, or rather my braces.  I'm not sure how many of you knew that I had braces on my teeth from March 2010 until May 2012.  It's a shame I didn't do this before my wedding, I would have loved my wedding photo even more.   The photos on this layout were taken the day my braces came off ... what a day that was!  I also have a hidden photo in a pocket of me before I had braces - wow, what a transformation!

On this layout I used 'washi tape' for the first time - it really is easy to use, it adds a little bit of dimension and pattern.  I also did some doodling on the banners.  Three things that are very trendy in the world of scrapbooking currently; washi tape, doodling and banners.


If you would like to see this layout in person, please visit Auntie Em's Scrapbooking in Cornwall!

Let me know what you think!

~Lorena~

Sunday, July 22, 2012

Cherry Tree double layout - featuring Kissing Booth

I have long since been a fan of Basic Grey - I would put them at the top of my list in paper companies.  However I must admit they have not had many lines in the past year that I have *Loved* but when I saw Kissing Booth I did love everything about this line.  Two tones of pink and brown, yes, my perfect combination for girly pages.  I am blessed to have both a daughter and a son, so I can go back and forth with the boy pages and the girl pages.  I have however been rightly accused of doing more pages of my daughter ... I think there are a few reasons for that:
  •  I love pink
  •  I love flowers - and while I still put flowers on my boy pages, I can go haul-ass crazy with them on a girl page.
  • My daughter is so much more photogenic than my son ... seriously she is a poser!
  • My daughter has been around longer - by 18 months :o)
Anyway, enough excuses, here is another pink layout featuring my daughter and myself.  We were both dressed in pink this day, and the cherry tree in a friend's yard was in full bloom, so we posed and had a mini photo shoot - it was a fantastic day.

Lesson learned on taking photos of your layouts on your Smart Phone though .... the photos are HORRIBLE - I photo shopped the crap out of these photos and they still turned out less than mediocre.


If you would like to see this layout in person, please visit Auntie Em's Scrapbooking in Cornwall!

Be kind and leave a comment.

~Lorena~

Saturday, July 14, 2012

Where Bloggers Create - Desert Cottage Tour

Welcome to all the My Desert Cottage viewers - this is the place where I create!

Take a look and let me know what you think!!  Thanks for looking .....

My Scrapping Corner is finally complete! I would like to give you a little tour of the finished room.
This is my desk area and the new desk area for a guest to scrap with me. Hubby bought me a TV for my scrap room, not sure I'm ever going to get anything done now! Ikea Expidit shelving under the counter top.

Desk area for two to easily scrap. Ikea Expitit shelf hanging from the ceiling for additional storage. A new light above my desk, to go with the new paint and flooring.

Bottom left you can see my Cricut, and then my laptop, storage of buttons, brads etc in the stacking jars and candy jars. Storage boxes house my stickles, Sizzix/Cuttlebug folders, extra bling and flowers and paints. Punch storage on the wall with 5 towel racks again from Ikea. Tee hee, my vintage radio doesn't really fit with this room, but it's the only radio that will pick up anything in the basement :o)

Peg board for all my beading tools, scissors and fragile chipboard pieces that I don't want to put into bins. My Ott light and tool caddy. A cow bell to ring in support of my favorite hockey team when viewing the games on the "big screen" 19" TV. I think I need a larger splat mat though!

We used inexpensive counter top on top of simple 2x4's anchored to the wall - supported by balusters and trimmed out with baseboards! The Expidit shelving unit has optional drawers which I added two sets. I switched out the ugly knobs that the drawers cam with for some porcelain knobs that I picked up at a garage sale years ago, they are perfect! I added a shoe rack on top for my inks to sit on/in - until I find a better solution.
My stamp shelf is a 'plate shelf' again from Ikea and the cutting table is an old piece of furniture that we have had for a while, this was once my craft table, if you can believe that - that space and nothing more! As you can see, I have expanded LOL. The paper rack on the left is an inexpensive set from Walmart, and the rack on the right was built by my loving husband about 7 years ago; the shelves slide out, and it is on casters, built of plywood.

In this piece which I picked up from a yard sale I keep projects that I am working on on the right, and miscellaneous mini albums and such on the middle shelves. Magazines and my Copic class materials on the left. In the drawers I store my cling stamp sets and Big Shot parts. My Clip-It-Up on top - and room for two layouts on display. Love this flooring - simply beautiful!

Having my printer and my sewing matching out for use at any time sure makes it easier to throw a little stitching on a project, or print up a journaling spot or card sentiment. The dreaded plastic bin under the counter top is left over from my previous space and houses all my cards that I have made and not sold or given away. I will hang my bulletin board eventually.
Not the greatest shot, but shows you a full view of the back wall. And ignore the stack of layouts begging to be put into albums on the paper rack - you weren't supposed to see that LOL!

All in all I have 162 square feet of Scrapping Corner, and I'm loving my new space .... currently it is nice and neat and tidy. Ask me again in about a month for a photo and well ... it just won't be the same!

I would love to hear what you think of my space, please leave me a comment below.

~Lorena~

Wednesday, July 11, 2012

15K RAK winner!

Thank you to everyone who has visited my blog in the past two years, you brighten my day - every day - I enjoy what I do so much and I want to share my projects with you.  I love to get feedback (positive and constructive) and I read all of my emails!  To each of you .... thank you!
On that note, my 15,000+ visitors have been overwhelming to me, and I have decided that I will reward each of the people who have commented on my 15K RAK post with the prize - so, I ask that each of you send me an email with your full name and postal address and I will send my little assortment of flowers off to you via Canada Post .... so .... expect it in two weeks LOL bahahah - maybe they aren't *that* bad, but give me a few days to make some extra flowers for you!

my email is MailboxLorena (at) aol (dot) com

Yay everyone!!

~Lorena~

Sunday, July 8, 2012

Copic Techniques class at Auntie Em's July 28th

Join me on July 28th at Auntie Em's Scrapbooking for my next Copic Markers Techniques class.  You asked for it, and I have put together a class where you will come out with a finished product while still learning valuable new techniques.
We will be making this beautiful card featuring a Magnolia stamp "Tilda and Peony Tails" (hey I didn't name it, LOL) and an older Bo Bunny collection "Winter Joy".  We will be colouring our own flowers with the Copic Airbrush system.  If you are curious how the airbrush system works and want to try it out this is the class for you.  I will be teaching two techniques for colour co-ordinating your flowers in fact!

This class does NOT come with Copic markers included.  But I have provided the suggested markers that will be used in the class in order to match the paper line perfectly.  These colours will be available at Auntie Em's.  Check your collection to make sure you are not duplicating. 

E21 Baby Skin Pink
E29 Burn Umber
E51 Milky White
E57 Light Walnut
BV00 Mauve Shadow
V09 Violet
B00 Frost Blue
B24 Sky

Also I used R20, YG03, and YG07 but these can be substituted for similar colours.


Wednesday, July 4, 2012

Children's lifestyle photographer

The most talented photographer I know is coming to Cornwall! 
Jennifer Carroll from Live Laugh Photograph is coming to Cornwall on July 21st.   I can attest to her talent as she photographed my Wedding, both of my children's first photos as well as my maternity shots for both children.  I get the most compliments on my layouts that she has taken photos for.  This is an incredible value for her talent, and she is here for one day only folks! 


Book your appointment today.

Tuesday, July 3, 2012

15,000 visitors celebration! RAK time!!!

Wow - look at that - my blog is approaching the 15,000 visits mark!  And to celebrate this I am going to give away some amazing flowers that I have made.  It's easy to enter - all you have to do is become a follower and leave me a comment below!

I will make the draw once I've reached the 15,000 mark randomly from the comment entries.  RAK 4 U!!!

THE PRIZE!
You could win this assortment of flowers - just by leaving your kind words below!

I couldn't leave you without showing you some cards that I have been making lately - I love my Magnolia's and I'm stoked that Auntie Em's Scrapbooking is now carrying an assortment!!

An older style Maggie and a Stampin' Up teacup stamp that I used white heat embossing on.

Isn't she adorable?  Again, from the same set of Stampin' Up tea stamps, the Peony and "just for you" stamps.

The Father's Day card I made for my hubby from the kids!

Using the Cuddly Siblings Magnolia Stamp (currently available at Auntie Em's) and some Prima papers!

More Prima paper and flowers and the same Maggie stamp.


So - what do you think???? Would you like some Lorena flowers?  It's RAK time - follow and comment in my 15K celebration!

Total Pageviews

LinkWithin

Related Posts with Thumbnails