side bars

Friday, December 30, 2011

Introduction to Copic Markers class

Have you been thinking of trying your hand at Copic Markers and just don't know where to begin? 

I will be teaching a beginners course on Saturday January 14th in Cornwall at Auntie Em's Scrapbooking.

This course will include SIX markers!  I will teach you the different blending techniques and help you perfect your new knowledge.

I guarantee you will have a great time!

Spacing is limited, so please contact the Store to reserve your spot - 613-938-4888

Where: Auntie Em's Scrapbooking 109 11th St. Cornwall.
When: Saturday January 14th 1:30
What to bring:  If you currently have any Copic Markers, feel free to bring them, but not needed.
Cost: $60.00 + HST
Contact: Emma or Laura 613-938-4888

You class kit will include the following:

6 Markers: R39, R29, YG93, YG95, YR24, and my favorite BG10!
Images stamped on Copic's own X-Press It - best for Copic paper.
Assortment of different papers to experiment with
An educational information package for the note takers :o)

If you have the above markers and do not wish to duplicate, you can exchange for any colour we have in stock on January 14th ONLY, before the class begins.

Looking forward to sharing with you!

~Lorena~

Tuesday, December 27, 2011

New 2012 Copic colours!

I'm pretty excited to see February arrive!  Not because it will be the coldest month of the year, but because Copic is releasing a dozen new colours for 2012!
You can check them out on thier blog here, but I have posted a photos nabbed from the same blog.


I will be teacheing a Introduction to Copic Markers at Auntie Em's Scrapbooking in January, if you are interested in learning the basics this is the course for you!  The course will include a starter kit of 6 markers (no exchanges) and I will provide you with the knowledge and images to colour.

Contact me if you would like more details MailboxLorena@aol.com

Until then - enjoy the New Year!

~Lorena~

Tuesday, December 6, 2011

Sharing - punch storage solution

I use to keep my punches in a shoe box - on a shelf - hidden away and I would never end up using them.

Now they are in plain sight, but still off my desk.  I use a towel rack from IKEA to do the job. 

What a great solution, neat tidy and totally usable.

Share your crafty storage solutions, leave a comment.

Thanks for looking!

Saturday, December 3, 2011

Christmas is coming - a PageMaps layout

Christmas is coming - Christmas is coming!  Are you ready?  I've been thinking of Christmas for well over two months now.  I'm one 'of those' who has my Christmas tree up on the first of December without fail, and would probably have it up mid November if my husband would let me.  This year we haven't had much snow, in fact we didn't even have our first sighting of snow until nearing the end of November, so it's been more difficult for me to get into the Christmas spirit.  Crafting is high on my Christmas to-do list, from the handmade gift tags, to the multitude of Christmas cards I send out, to the individual hand made crafty gifts I give.  I enjoy my little Scrapping Corner in the evenings.

So, here is a layout I did for the Auntie Em's design team - using the PageMaps Calendar's December sketch and my favorite Christmas line of patterned papers Jovial from Basic Grey - yup, it's last year's paper, but it still remains my favorite!!


For my layout I choose a great photo of my daughter on her first Christmas. I fussy cut (and those of you who know me, know how much I *love* to fussy cut) some of the snowmen and snowflakes from one of the patterned papers and popped them up on some of the circles. I also used a Trinket from Bo Bunny and some Webster's Pages Trim. The poinsettias are about as old as my stash is, they must be at least 6 years old - lets put it this way they are older than when Prima started dating everything on their tins; and since they don't even use tins anymore - they are old LOL!!


The journaling I snagged from an AWESOME 600+ page book available at Auntie Em's called "Inspiration Station" it is just full of verses and quotes and poems. Also it has a whole section devoted to layout titles! Great if you are stuck for writing something or just want to add a little bit of sophistication to your page. You won't be disappointed with this book!  Again I used my sewing machine to stitch around the outside of my layout and inked with distress ink, um... just about everything!

Let me know what you think! Please leave a comment.

Wednesday, November 30, 2011

Christmas Card Exchange + some RAK!

Time for another card exchange at Auntie Em's Scrapbooking ... this time it is Christmas Cards!

Yay, I just love Christmas and love making my handmade cards so much too.  I know there are people who look forward to my cards ... I'm sure there are others who just don't give a damn weather they get a card from me or not, let alone weather it was lovingly hand made or not.

I scraplifted this design from this website - I loved the simplicity of it, the white space, the embossing ... everything about it screamed LORENA!  So, here is my take on it.  It was more than a 3 step process ... but then again, what card isn't??

The dove I heat embossed with UT 3 times, then after it cooled I cracked it and inked it to bring out the cracks.  The wreath is embossed in white, then the leaves coloured with my Copic Markers and then a touch of Distress Ink (Antique Linen) to bring out the embossing.  A twine bow and an embossed sentiment (embossed in a mixture of gold and pewter powders to give an antiqued gold colour) The ornaments or little dots, whatever, on the wreath are Liquid Pearls in Platinum Pearl.

I have to admit, I had fun with this card.  Usually when you are doing 20 of the same card it drags you down after about 5.  Every time I made a card I looked at it and exclaimed "I love this card"

So... for those of you who will be receiving a Christmas card from me ... you may end up receiving a card from the exchange.

If you would like to receive a handmade card from me, leave me a comment with your email address and I will contact you for a mailing address - how is that for RAK??

In the meantime, let me know what you think of this card!

Thursday, November 17, 2011

Two new Copic techniques

I was inspired to make a Vintage card by a very creative talent; Lacey Stephens - see her blog HERE.  I used her tip of stamping the image in brown ink instead of black.  It made a world of difference.  I would love to have made my card with the new Bo Bunny "Snowfall" collection, but I haven't got my hands on it yet... so I settled for their 2008 collection "Winter Whisper"   I'll tell you something, Bo Bunny has come a L-O-N-G way in three years ... from single sided very thin paper, to double sided cardstock and all the 'fixins'!  I love the brown and blue together, so it worked well to give the vintage feel I was going for on this card/image. 

I stamped a Magnolia image, Fairy Dust Tilda, and coloured her in all blues and browns.  I double mounted it with Spellbinders and a bit of Webster's Pages trim.  I used a Bo Bunny trinket which was originally a dark tarnished copper colour, and heat embossed it white.  A little bit of glitter and twine and finished.

My second card encompasses a totally different technique, it is called "no lines" colouring.  How you achieve this is by stamping the image in a very pale colour, usually blue.  However I don't have any light blue ink, but I do have a Stampin' Up ink called Pink Pirouette.  It worked very well for my needs.  Everything I was reading online suggested that this technique is very difficult.  I didn't find it as difficult as I feared ... but I will say that this first image is NOT my best work, and practice will make perfect (or at the very least, better)  I decorated this card with some various Prima flowers and a pebble.  Some very old paper from my stash, from one of those large packages the your non-scrapbooker friends give to you for Christmas thinking that this is an awesome gift because it is 100 sheets of scrapbook paper.  What they don't know is that you will be using the backs of the same paper for white backgrounds as the fronts of the paper are such a Dog's Breakfast of colours and shapes that you will never use more than 3 or 4 sheets.  Well I think this was sheet 5 out of that package.


Let me know what you think of these techniques, please leave a comment; they are free, just like smiles at McDonalds!

~Lorena~

Wednesday, November 16, 2011

vintage inspired layout to share

When I first layed eyes on this collection I was blown away - so much potential - very vintage, and floral.  I loved the burgundy with the browns and greens!  Simple Stories Generations.


Design Team work for Tina's Scrapbooking:


Supply List:

Patterned paper: Simple Stories - Generations collection
Flowers: handmade, Prima and Websters Pages
Bling: Prima
Other: Martha Stewart punch, distress ink, glimmer mist and a whole lotta fussy cutting (which I loath)

Enjoy and tell me what you think by leaving a comment!

~Lorena~


Tuesday, November 15, 2011

Sharing

Some cards that I did with the stamps from the stamp exchange at Auntie Em's October stamp exchange.

I used both Copic Markers and Distress inks to colour the images.


Enjoy!

Sunday, November 6, 2011

Thursday night Copic evening!

My friend Michelle and I got together this past Thursday and we did some stamping and Copic colouring.  It was a great time, filled with hot cocoa and laughs.
I love Michelle's choice in stamps too, she always finds interesting characters to buy.  Me I buy the same thing over and over "cutesie" charachters and it just seems I'm in a rut.  I love the idea of a stamp share though, where you bring your ink and paper and stamp images from others in exchange for stamps from your collection to them.  Check out Michelle's blog HERE

So, I only ended up colouring up two images and putting them to a card. 

For my first card "Ho ho ho" I thought the girl looked a little ... how shall I put this .... underdressed for Christmas?!  Anyway, hence the sentiment was born :o/  I paired it with the 2010 Christmas line from Basic Grey - Jovial (still one of my ultimate favorites)

My second card is more of a winter sceen, and I used the 2010 Bo Bunny Winter Collection - Winter Joy (again one of my favorites) I added a couple of Prima flowers and a rub-on from Cosmo Cricut ontop of a snowflake that I had embossed onto vellum (it was a leftover from a previous project)
I have some other projects in the works, keep your eyes on this blog for something crafty in the BEAD department!

Enjoy!

Lorena

Wednesday, November 2, 2011

Copic art

One of my besties is having a baby at the end of this year (or early into the new year) and has asked me to do some copic colouring for her baby girl's room!  Needless to say I am super excited to have my colouring on the walls someplace other than my house or a scrapbook store - it means so much that she thinks of my work with high regard.  Either that or she doesn't have very many artsy friends :o)


Anyway, off I went to Copic Marker Scrapbooking to pick up some images to colour - wow they have some cute stuff on their site!  And every so often they offer up some freebies! 


Here are some images I've coloured so far - your opinions are most welcome


Well that's about it for now folks, let me know what you think! Honesty is appreciated!

Tuesday, November 1, 2011

November Page Maps Reviel

Here is my take on the Page Maps sketch for November for Auntie Em's Scrapbooking and Beading in Cornwall.  Emma gave us the totally amazing, fantastically desirable Et Cetera line to play with!  I was a pig in poop with this!  I love this line and was stoked to be working with it.  Also you will notice some Prima floral rosebud trim and Bo Bunny buttons from the Welcome Home collection - proof that you really can mix and match!  Be sure to check out Auntie Em's Scrapbooking blog HERE for more inspiration and an inspirational sale going on for the month of November at the store!


So Hungry I Could Eat My Socks


3 Cards:


Supply List:

Bo Bunny - Et Cetera collection: patterned paper, wraps, trinkets
Bo Bunny - Welcome Home collection: buttons
Prima: Floral Rosette Trim
Basic Grey: brads
Core'dinations: cardstock (love that stuff)

Thursday, October 27, 2011

First Christmas Layout of 2011!

Well there is less than two months to Christmas .... yes, believe it or not, you have less than 60 shopping days left to get all of your gifts bought, wrapped and under the tree.
Traditionally I put the tree up on December 1st, but I'm just not feeling the spirit ... maybe I will in December, but until then I have my craft - my art - my scrapbooking.

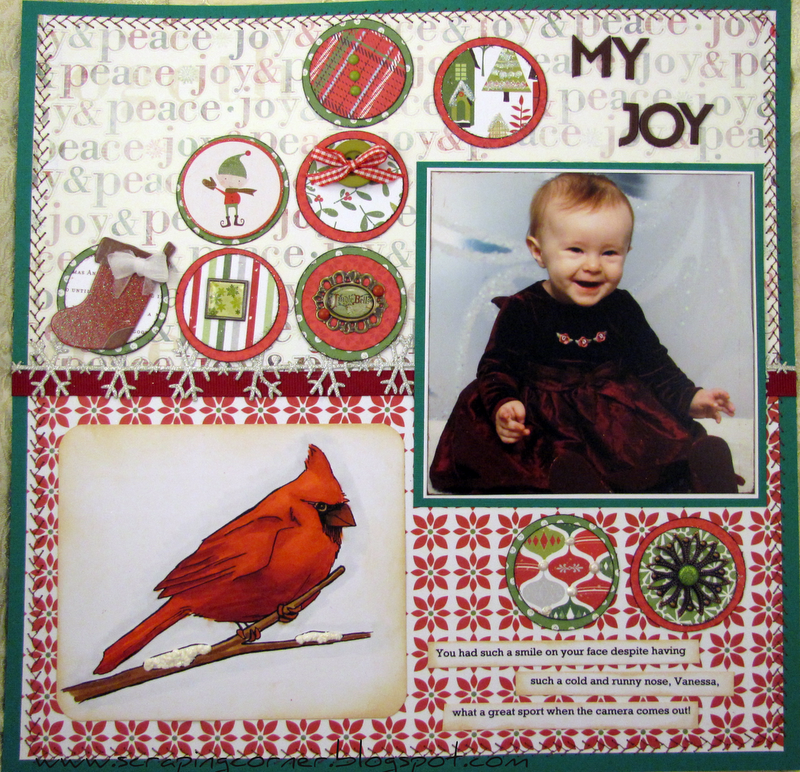
Tina gave me some Little Yellow Bicycle "Wonder & Wishes" to design with. I used an old photo of my daughter.  This was her first official photo shoot.  I think it was November 2008.  All I remember is she has a really snotty nose, and it was just after my father had passed away.  It really wasn't a great time in my life.   But she was such a good sport, she smiled so big for the camera ... I was one proud Momma that day.

I used the Scrapbook & Cards Today 2011 Sketch Calendar  for this layout.  I always love a single photo layout, and December was perfect for this layout.

My Joy


Supply list:
Patterned Paper: Little Yellow Bicycle
Cardstock: Bazzil
Extras: Little Yellow Bicycle chipboard, Basic Grey letters, button, and brads, Bo Bunny Trinkets, Misc. ribbon.

I white washed the "joy to my world" patterned paper at the top, it was just too distracting, not that the poinsettia paper at the bottom wasn't, but I could cover most of it up with the photo, journaling and Copic image.

I'm also thinking of applying for a new DT position. This one with Copic Marker Scrapbooking. They get alot of exposure and I think I might be a good fit.    Sometimes I doubt my ability. I think that everyone is so much better than me. What is the worst thing that can happen/be said? Well they can say "thank you for your interest, but we have selected others" and then I look at who they have selected and say "wow, they are good, damn good, you made the right decision" but if you don't try you never will get rejected, nor will you get selected huh?

So, anyway, the cardinal is from Copic Marker Scrapbooking.  I'm still sitting on the fence weather to send this to them or not.  Notice the Puffy Velvet on the branch? It's suppose to look like snow .... hubby says it looks like bird poop.

That's it for this round, enjoy!

Wednesday, October 19, 2011

New Design Team position

I'm very excited to announce that I have been selected to join the Design Team with Tina's Scrapbooking Creations in Winchester Ontario.

I have been added along with 4 other very talented gals!  I invite you to take a look at the bio's and blogs of the other ladies here

Here is a little something that I have been working on with the new Printery collection from Prima Marketing.


This layout is a photo shoot that we had done for my first Mother's Day after my daughter was born - she was about 2 months old here.  I have some huge regrets about these photos though.  The photographer; Roxanne Morin was wonderful enough to put the entire photo shoot onto a CD for me, and I have since lost that CD and only have the photos that I printed out originally - I haven't even got them saved to my computer.

Supply list:
Patterned Paper - Prima Marketing - Printery collection
Canvas - Prima Marketing - Printery collection
Stamps - Prima
Flowers - Prima - Londonary collection
Bling - Prima
Resist - Crafter's Workshop
Glimmer Mist
Letters - Basic Grey

You see that little bow on the waist of the dress form?  That was done using a dessert fork!  Yeah pretty neat technique.

Thank you for looking!

Sunday, October 16, 2011

Bo Bunny Card Sketch Challenge

Three cards to share using the Bo Bunny Forever Fall Collection.  I'm really liking the colours in this, especially the teal blue with all the rusts and browns and oranges!  What a great colour combo!


The Happy Anniversary card used the stamp collection too!

Sunday, October 2, 2011

Auntie Em's October Page Maps

Time again for another reveal from the Page Maps Calendar for Auntie Em's Scrapbooking.


This month Mellisa and I used Basic Grey's Sugar Rush collection and a Doily from Basic Grey and some sparklers from Webster's Pages.


The Sugar Rush collection was alot of fun to play with, there are so many colours that you can really pull out from this line.  I did two layouts, one I kept very basic and straight forward and the 2nd layout I used more details and alot more colour.


The first layout I have titled "Hangin Out"

The journaling reads:
"You guys have so much fun on the swings.  This was a fantastic fun day in Winchester, April 9, 2011"
Supply list:
Pattered Papers: Basic Grey Sugar Rush collection, Bazill Basics, Basic Grey Doily
Flowers: Prima Londonerry collection
Jewls: Webster's Pages
Chipboard Letters: Basic Grey
Machine Stitching - Husqvarna


The second layout I have titled "Dad & Daughter"


I loved all the colours of this line, but didn't know how to use all that paper without it fighting with itself. I decided to roll little bits of it and hide it under the vellum of my title.  I used vellum again on the journaling which is a poem I nabbed from the net on scrapbook.com - it reads:


"Dream Come True: a daughter is a dream come true, pink lace, ribbons, fluff and froufrou, giggles, kisses, bubbles and bows, she's such a sweet dear from her head to her toes."


Supply list:
Basic Grey - Sugar Rush collection patterned paper and doily
Vellum
Prima flowers
Basic Grey brads
White Pigment ink - Stampin' Up
bubble wrap
This month the Inspirational sale at Auntie Em's is Basic Grey Doilies - you can save 10% off every doily you buy just by saying that you were "inspired"


Enjoy! 

Total Pageviews

LinkWithin

Related Posts with Thumbnails